
The tile challenge I am sharing
right now is one among my favorites I’ve ever executed — to begin with as a result of it was SO
straightforward, because of this superior product, and since it’s stunning!
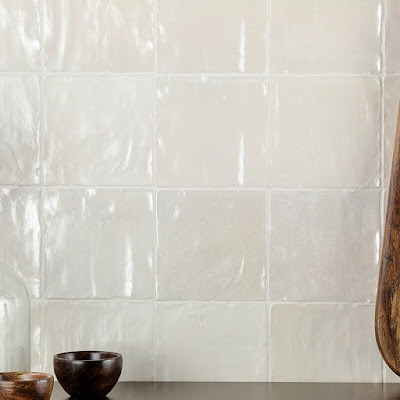
I fell onerous for a sq., barely shimmery tile referred to as Zellige.
Seems it was very fashionable a couple of years in the past…as common I am manner behind
on the tendencies. (And I am positive with that.)
It has a wavy texture that makes it
look handmade…and often it’s! The actual stuff is VERY costly, however I actually needed to make use of it for the small
backsplash in our laundry/mud room:
This publish could include affiliate hyperlinks to your comfort.
I’ll earn a small fee when you make a purchase order by hyperlinks.
You may set up in a straight stacked appear like this for a extra fashionable look,
or in a brick sample for a extra conventional look.
The factor is, genuine Zellige tile is handmade from clay and has an
imperfect look that I do not at all times love. Additionally, it is often put in very
shut with small grout strains (which provides to the imperfect look).
I’ve at all times
most popular the extra uniform variations I’ve seen, with a little bit of distinction with
the grout.
this ceramic version
pictured above that also has the handmade look, however may be very reasonably priced!
Plus every tile is uniform and the identical dimension, however nonetheless has the gorgeous
particulars that I cherished about the actual stuff.
It went into my cart! I used to be even
extra happy in particular person — they have been so beautiful!
I had a pair hiccups on this tile course of alongside the best way as a result of I did not order sufficient
at first. I needed to wait on backorders after which the second cargo was
a lot shinier than the primary. I used to be in a position to choose and select out of the
packing containers to seek out some that matched higher.
You may most likely be capable of keep away from this by shopping for all you want directly so
they’re from the identical lot quantity.
However general the set up course of was a breeze! I
used a non-mortar set up product that makes the tile set up SUPER fast and mess-free.
Earlier than you begin tiling, work out the center of the realm you may be working
on. Since ours was the backsplash, I marked the center and centered a
tile on that:

I then lined up the tiles every route to ensure I wasn’t going to have
any tiny slivers on the ends.
so rapidly. It is a
tile setting mat
that you just use as a substitute of mortar:

Humorous factor is, I acquired these adhesive mats as a present YEARS in the past…I am speaking most likely ten
years again. I did not have any want for them then, and tucked them away in
the storage the place they sat. I forgot about them until we moved.
I wasn’t positive in the event that they’d even nonetheless work, however I stored the mats hoping to attempt them one
day.
Fortunately they labored SO properly and have been loopy straightforward to make use of! They’ve a
sticky again that you just connect to the wall, and a powerful adhesive that grips the
tiles on the entrance.
Merely stick the mat on the wall, and while you’re prepared, peel the paper off the sticky entrance:

I used one and a half packages for the entire challenge. I am actually impressed with this product.
I like that this mat makes it simpler to work in sections. You may stick the mat to the wall and stroll away from the challenge at any level.
Your tile ought to embrace particulars that can provide help to decide what dimension tile spacers and grout joint dimension you may
want to make use of. This one prompt 1/16″ grout strains. I considered not utilizing
spacers in any respect, however determined ultimately to make use of the them for a extra uniform
look.
My countertop was stage, however I made positive to verify the tile as I used to be going to
be certain that it was stage as properly:

I needed a extra conventional look, so I did a brick sample — that is additionally
a bit extra forgiving for my part.
You must be fairly meticulous so
the strains match up completely with a straight stack tile format:

When you have shops or switches to work round, you may want to show the ability off on the
breaker and take your outlet cowl off to work round them:

Maintain your tile mat up and hint the place you may want to chop earlier than sticking it
on the wall. You need to use a utility knife or scissors to chop the mats.
The mat is VERY sticky, however you possibly can take away tile and rearrange it at first if wanted. I am undecided how that might work after it has been caught for awhile.
small (and it was COLD within the storage the day I used to be putting in), I went with
a tile cutter
as a substitute.
It’s SO straightforward to make use of! You simply line up your tile the place the lower must
be:

Then you definately roll the diamond blade alongside the tile with some stress to attain
it. Be sure that your stress is constant from begin to end.
Simply push down and it snaps the tile in a clear line:

It really works so properly and tremendous quick. You need to use these for bigger tiles too —
simply be certain that the cutter you get will work to your tile.
The one situation I had was reducing smaller slivers of tile. I discovered that if I
scored it with the identical stress from the underside to prime, I might get fairly
small cuts.
All the time order about 10 p.c extra tile than you may want!
My situation with not utilizing the moist noticed was reducing round shops. With a tile
noticed you possibly can tilt the tile towards the blade for complicated cuts. There are different
methods to do it too — I used to be about to expire and purchase a diamond blade for my
Dremel device once I seen one thing as I used to be reducing with the tile
cutter…
I noticed the 2 items could be matched up completely after being lower.
I acquired an thought — I measured the place I wanted to chop for the outlet, then used
the tile cutter to make these.
Gorilla Glue, matched them again up and clamped them collectively for at the very least an
hour:

It labored! I wasn’t positive it might maintain and was pleasantly stunned.
It even labored once I needed to lower the tile into three components to work round an
outlet:

I did child them a bit as I put in — ensuring to not push to onerous. However
they appear nice and you’ll by no means be capable of inform that I lower them aside!
Which will provide help to as properly if you do not have entry to a moist noticed.
One other wonderful thing about utilizing the tile setting mats is you possibly can grout
instantly, not like mortar. I used this premixed, sanded grout to complete up this tile backsplash:

Be sure that to guard your surfaces earlier than beginning!
pre-taped plastic sheets
for tasks like this — you stick the painter’s tape on after which pull the
plastic out. It sticks to any floor simply:

Mortar and grout aren’t probably the most enjoyable to put in on a vertical floor —
you may lose rather a lot to the ground or counter.
I did not have a grout float (mine was a large number and I had tossed it months
in the past) so I simply used a plastic putty knife — and I feel it was even simpler
to make use of:

after, use a large damp sponge and a bucket of water and begin wiping extra grout off the tile.
If there are any spots you missed, you possibly can often
transfer the it round and fill in with the grout sponge.
You may want to make use of clear water and wipe a couple of extra instances with the sponge to
get any grout haze off of the tile. Grout will lighten because it dries, so do not freak
out if it does not look proper at first!
In case you are tiling a flooring or a
backsplash the place that can get put on and tear, you may wish to use a grout sealer afterwards so it does not stain.
Not too dangerous proper? The set up went fairly rapidly!
To complete up that half
of the wall, I made some fast “floating” cabinets to hold between the
cupboards:

I used scrap luan and wooden after which nailed them in from inside the cupboards.
A little bit piece of trim throughout the entrance completed them off:

This tile is SO fairly!! It is available in cream, white, blue, grey and black. All
are stunning.
I went with cream for a lot of causes, however largely as a result of our
higher cupboards aren’t pure white. I fearful the white tile would
look off towards them.

By the best way, if in case you have an outlet in an odd spot — take your tile down
the wall! It flows so significantly better than ending it awkwardly on the wall
round an outlet.
I LOVE this room!:

Here is the place I began with this space:


Trending Merchandise


